A TMP and blogging buddy who is probably known to the majority of readers here has, for the last while, been putting together a set of ancients rules called
To The Strongest!He has been kindly keeping me updated as his ideas solidify. Like my own
nascent set, his uses squares and cards; unlike mine his has been written up into presentable form and has been fairly extensively play-tested!
I read through the latest version of his 'lite' variant the other week and was so enthused by the new changes that I set up a game the next evening, based upon Dertosa 215 BC, the battle in which Hasdrubal Barca near the Ebro signally failed to emulate his brother's great victory on the Aufidus, this due mainly to an over-reliance on some flighty allies. What follows is an account of the action, though I must apologise in advance for the mistakes I made before and during the game...
To start with, here are a few observations on the armies involved.
Orders of Battle
Given the limitations of my littler table (12 squares by 8) I had to pare down the historical forces to achieve manageable levels. While I would have preferred to dedicate eight columns to the infantry this would not have given enough room on the flanks, so I went with six columns in two or three ranks, thus leaving three columns on either side for the cavalry and elephants to run about in.
Roman units:6 x velites, 6 x hastati, 6 x principes, 2 x triarii, 4 x equites, general and 3 sub-generals. The army is commanded by the brothers Gn. and P. Cornelius Scipio, and is comprised of around 22,000 infantry and approx. 2200 cavalry.
Carthaginian units:
6 x Libyan heavy infantry, 8 x Iberian scutarii and 3 x caetrati, 1 x slingers, 2 x elephants, 3 x Numidian light cavalry, 2 x heavy cavalry, general and 3 sub-generals. The army is commanded by Hasdrubal Barca and is composed of around 21,000 infantry, 2,900 cavalry and 20 elephants.
Note:
Hasdrubal should have been given two extra units of heavy cavalry to reflect his historical numerical superiority - closer to 7 to 4 than the 5 to 4 I gave him here - more accurately. In my hurry to set up I misread my notes and omitted 900 of the heavy cavalry - there should have been around 3,700 Carthaginian horse (*blush*).Deployment
Both sides have four commands: two in the centres and one for each wing. In these rules armies activate by command, and once a command fails in an activation attempt that command is finished for the turn, meaning that no other units within that command may activate.
As in the historical battle, the Romans formed up in the centre with their cavalry on the wings and the Carthaginians put their weaker Spanish in the centre and the veteran Punic infantry outside them. Hasdrubal enjoyed cavalry superiority due to the presence of Numidian light cavalry (
but [see above] not as much of a superiority as he should have had...) and boasted a couple of units of elephants as well.
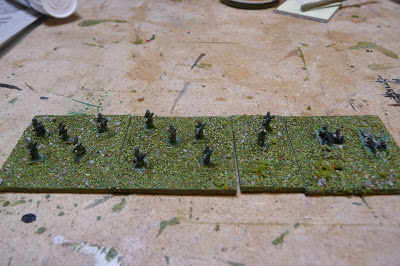
![]() |
| Deployment, looking from behind the Carthaginian left. |
The Romans advanced on turn one and pushed forward to skirmish with their velites where commands allowed. The skirmishing - as the name implies - was inconclusive.
The Carthaginians held back on their right flank and advanced vigorously on the left, where they had a distinct cavalry advantage. The infantry however were not so keen to get involved (
command activation failures).
On turn two the Romans closed in the centre and the skirmishers engaged along the line.
The Carthaginians still held the advantage on the left but again their infantry was reluctant to press the assault (
command failures). The Punic cavalry engaged in melee and traded hits with the Romans while their Spanish allies tried to position themselves on the Roman flank.
![]() |
| On the left the Punic cavalry attack while the Spanish manoeuvre towards the flank of the equites. |
On the right the Numidian cavalry skirmished, but made little headway against their stalwart opposites (t
heir shooting missed).
Next turn the Romans tried a death-or-glory assault on the right (
they had already taken a hit; another would destroy them), and succeeded in breaking the Punic cavalry, who took the sub-general with them off the field (
it was a cruel blow - the Carthaginians lost 4 of their 13 victory banners at once).
On the Roman left the elephants and Numidians prove a formidable combination, but the equites did commence to force one unit of Africans backwards (
charge/evade sequence).
Things were pretty tight in the centre. A quite atrocious combination of poor card draws (
and a rules misread) prevented the light troops from dispersing as they ought to have.
Hefty ancient types with swords and spears were everywhere...
...except in the very centre, where the line was noticeably thinner on the Carthaginian side.
![]() |
| At least some of the Spanish are eager to get to grips... |
Over the next few turns both sides tried to push on where they had the advantage and shore up their weak points.
![]() |
| Carthaginians trying to see off the Roman cavalry for good. |
![]() |
| The heavy infantry close and the fight begins in earnest. |
As the fighting intensified it became apparent that the Spanish infantry could not compete against the legionaries. The Libyans could hold their own, but if Hasdrubal's cavalry could not turn the Roman flanks quickly the day would be lost.
The key battle for Carthage was on the left. Eventually they managed to remove the Roman cavalry from the field, gain a positional objective and ready themselves to fall on the Roman flank (
this took about two turns longer than expected due to command failures and poor attacks).
But in the centre the combat was highly attritional. With three units of scutarii destroyed and others in difficulty, the Libyan reserves were forced to come inwards to close the gaps about to open up.
The scutarii tried to make rally attempts before doing any attacks but usually they failed at both. They would perhaps have been better served exchanging lines or falling back, but when they did attempt that they failed their activation attempts. An entirely historically appropriate lethargy was approximated!![]() |
| One gap, opening up! |
On the Roman left the cavalry managed to simultaneously hold off the elephants and drive back the Numidians, but their own destruction was never more than one hit away (
they tried to keep the pressure on the Numidians by forcing them to evade, at some risk to themselves).
![]() |
| The Carthaginian veterans begin to exert pressure on the Roman lines. |
The Carthaginian efforts to turn the Roman right flank were frustrated by poor command cards, but on the right the Numidians finally landed a decisive volley of javelins, and one unit of equites fled. The other determinedly held on against the elephants in a tense exchange (
the cavalry and general drew two successive saves to preserve themselves - and perhaps the army - from destruction).
With the gaps in the centre becoming too large to plug, the Iberians attempted to pull back and bring the Libyan reserve up in support.
But the next Roman attack destroyed the retreating unit, and the Carthaginians had no victory banners left.
![]() |
Caught on the hop...
|
Game over!
The casualties:Rome: three units of equites, one of hastati, one of velites, one general comes to 11 banners lost.
Carthage: five units of scutarii, one of cavalry, one of lights and a general for 15 banners lost (
but a territorial objective won kept them in the game longer).
It turned out to be a fight which Carthage could have won given a little more luck and better decisions on my part. The error with the number of Carthaginian cavalry units at deployment was probably made up for by a mistake with the skirmishers, to whom I initially attributed a greater staying power than the rules permitted. Thus, relatively speaking, the decisive or potentially decisive elements - the heavies of the Roman centre and the flanking units of the Carthaginian left - both got into their work relatively late, and at about the same time, so we still saw a close-to-historical result.
Well, so much for the battle, and my imperfect prosecution of it; it's now time for some comments on the rules themselves.
Rules Thoughts.
While there are some subtleties to the rules that I did not thoroughly explore - the evade rules, the line exchange abilities, the proper use of skirmishers and the best way to use sub-generals - the object of the exercise was to get a handle on the general flow of the game and observe how the various elements work together.
There are some nice smooth mechanisms in the rules. They play well now and will no doubt play even better as the author fine-tunes how best to realise his vision on the tabletop.
The rules look as though they will be easy to customise, by which I mean that troop types can be fairly simply differentiated by tweaking abilities here and there, which is a great advantage when looking at the ancient world, where differences between broadly similar types of troops are an important way to add depth and interest to a grand-tactical game.
There is scope for generalship but just enough reliance on luck to keep everyone interested. In this respect I think they channel one of the best features of
Commands and Colors: Ancients; namely that the better players will have an advantage, but not so much so that there is no point anyone else having a crack at them. The rules combine old and new school techniques, and they will give an enjoyable game if players get into the spirit of things. Importantly for sustaining player interest and loyalty over a longer period, I'm pleased to report that going by how they handled Dertosa it looks as if they will be able to give results that are satisfying and plausible on the historical level.
Well, I think I'll leave it there before I start overstaying my welcome (if I haven't already!). I enjoyed the game, will follow the author's progress with interest, and touch wood this will not be the last report using these rules to be posted here on the blog!